AWS Computing
Setting up AWS Single-sign-on (SSO)
Make sure you have AWS cli installed on your local machine.
aws configure sso
SSO session name (Recommended): <anything>
SSO start URL [None]: <add the start URL, can be found in slack>
SSO region [None]: us-east-1
<Enter>
This should open a URL in your browser - accept access
CLI default client Region [None]: us-east-1
CLI default output format [None]:
CLI profile name [XXX-AccountNumber]: cnh-sso
You can now use this new single-sign on profile as
aws s3 ls --profile cnh-sso
Install the AWS Session Manager plugin on macOS
Follow the instructions here to install the plugin required to connect using AWS Sessions Manager.
curl "https://s3.amazonaws.com/session-manager-downloads/plugin/latest/mac_arm64/session-manager-plugin.pkg" -o "session-manager-plugin.pkg"
sudo installer -pkg session-manager-plugin.pkg -target /
sudo ln -s /usr/local/sessionmanagerplugin/bin/session-manager-plugin /usr/local/bin/session-manager-plugin
curl "https://s3.amazonaws.com/session-manager-downloads/plugin/latest/mac/session-manager-plugin.pkg" -o "session-manager-plugin.pkg"
sudo installer -pkg session-manager-plugin.pkg -target /
sudo ln -s /usr/local/sessionmanagerplugin/bin/session-manager-plugin /usr/local/bin/session-manager-plugin
Launching an EC2 Instance from AWS Service Catalog
First, make sure your region is set to us-east-1; all work should be performed within this region.
We have created an EC2 instance template with precompiled utilities and tools, available within the AWS Service Catalog.
- Navigate to the
Service Catalog. - Under
Provisioning, selectProducts. - Select
BTI Researchand ClickLaunch Product. - Enter a name for this product so you'll easily remember why you created it (e.g. "Rokita-code-reviews" or "Rokita-dev").
Follow the remaining instructions, filling in your GitHub email and username.
Select an instance type (specs below):

- Select the amount of storage you'd like, keeping in mind that this can be expanded later and we pay for the storage we select. Typically, you can start at 500 GB or 1 TB.
- Click
Launch product. At this point, the instance will start creation and once complete, you will be able to see the instance ID (i-###################). - Click the instance ID link and navigate to the top right of the page, where you will see the
Private IPv4 addresses. - Connect to your instance using one of the methods below.
Connecting to Your EC2 Instance
Using the profile set up above, type the following two commands to get into Session Manager, then your EC2:
aws --profile cnh-sso ssm --region us-east-1 start-session --target i-###################
sudo -iu ubuntu
You are now connected to your EC2 instance!
Deprecated
The direct SSH setup below is retained for historical reference and does not work while connected to the VPN. Use the SSM tab above instead.
You can use VS Code to connect to the EC2 instance through AWS Session Manager using SSH ProxyCommand (no separate port forward required).
1. Create an SSH key (if you do not already have one) and add the public key to ~/.ssh/authorized_keys on the instance.
ssh-keygen -t ed25519 -C "ec2" -f ~/.ssh/ec2_ed25519
2. Open your SSH config in VS Code:
- Command Palette:
Remote-SSH: Open SSH Configuration File... - Select
~/.ssh/config
3. Add a host entry to your local SSH config:
Host bti-ec2
    HostName i-###################
    User ubuntu
    IdentityFile ~/.ssh/ec2_ed25519
    IdentitiesOnly yes
    StrictHostKeyChecking accept-new
    UserKnownHostsFile ~/.ssh/known_hosts
    ProxyCommand aws --profile cnh-sso --region us-east-1 ssm start-session --target %h --document-name AWS-StartSSHSession --parameters "portNumber=%p"
4. In VS Code, open the Command Palette and choose Remote-SSH: Connect to Host..., then select bti-ec2.
To begin working with GitHub on the EC2 instance, you must create an SSH key on the instance and add it to GitHub (see Using GitHub).
Stopping or Terminating an EC2 Instance
To STOP an EC2 instance (or shut it down for later), you can either:
-
Type
into your console while inside of the instance ORsudo shutdown -h now -
Navigate to the instance within the AWS Console, click on
Instance state, and ClickStop instance, as below: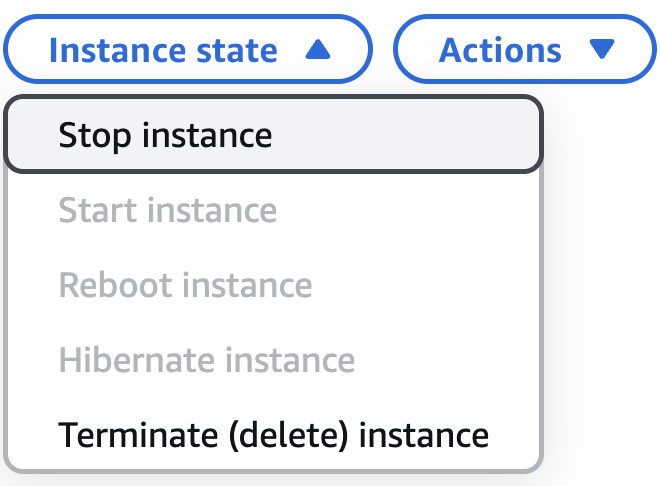
To TERMINATE an EC2 instance (or delete it for good and stop storage charges on it), navigate to the instance within the AWS Console, click on Instance state, and Click Terminate (delete) instance.